With Mumara, you have the ability to create and manage contact lists with ease, allowing you to efficiently organize and target your contacts.
¶ Contact Lists
The Contact Lists page is where you can view all of your created lists, with multiple sorting options available (the default sorting is by creation date in descending order). This page provides an easy-to-use interface that allows you to view, edit, and manage your existing contact lists and groups.
In addition to basic list management functions, such as adding a contact, importing and exporting contacts, making a copy, exporting to CSV, splitting a list, and merging lists, Mumara offers advanced list segmentation and targeting features. These allow you to create targeted lists based on specific criteria, such as custom fields, open and click tracking, and other factors.
The interface for managing your contact lists is user-friendly and designed to make it easy and efficient to perform a wide range of tasks. With Mumara, you can efficiently manage your contact lists and groups, and take advantage of advanced segmentation and targeting features to improve the performance of your email marketing campaigns.
¶ Add a Contact List
To add a contadct list, navigate to Lists and click on Add Contact List. Alternatively, you can go to Contact Lists page and then click on [+Add New] button.
Dependencies: Before you can add a contact list, you’ll need to make sure that you have already added a Sending Domain and a Bounce Address.
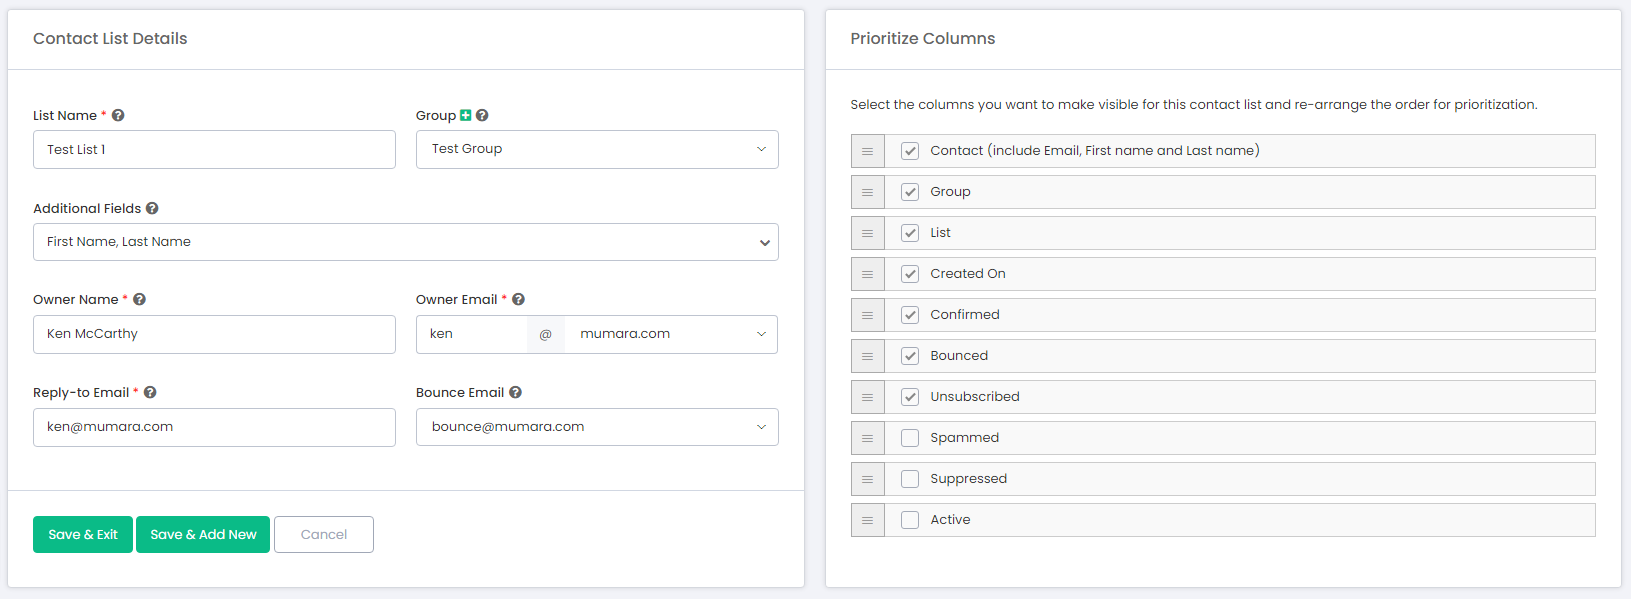
¶ Fields
Following are the form fields available when you add a contact list.
| Field | Type | Details |
|---|---|---|
| List Name | Text | Name the contact list you are creating. |
| Group | Dropdown | Create/select a group you want this list to be sorted in. |
| Profile Fields | Multi Selection | Select custom fields from the dropdown menu to be assigned to the list. These custom fields allow you to store additional information about each contact, helping you to better organize and target your email campaigns. |
| Owner Name | Text | The owner of a contact list is the person who owns and manages the list. This information can be added to the “Mail-From” headers if you select sender information to be fetched from contact list details when scheduling a broadcast. This can help to improve the credibility and authenticity of your email campaigns by clearly identifying the sender of the message. |
| Owner Email | The email address of a contact list owner must be associated with one of the confirmed sending domains in order to create a list. It is important to add the owner’s domain to the Sending Domains section before creating a new list on it. This ensures that all email communications associated with the list are authenticated and helps to improve deliverability and sender reputation. | |
| Reply-to Email | The email address where you want to receive the replies from the recipients. | |
| Bounce Email | The email address where you want to receive delivery reports for failed messages is known as the bounce address. Before you can set a bounce address, you need to add the email address to the Bounce Addresses section. This ensures that any failed messages are delivered to the designated email address, allowing you to quickly and efficiently manage any issues that may arise. |
¶ Prioritize Columns
You can choose which columns to display and re-arrange their order for prioritization on the View Contacts page for a specific contact list. This feature allows you to customize the page view to fit your specific needs and preferences.
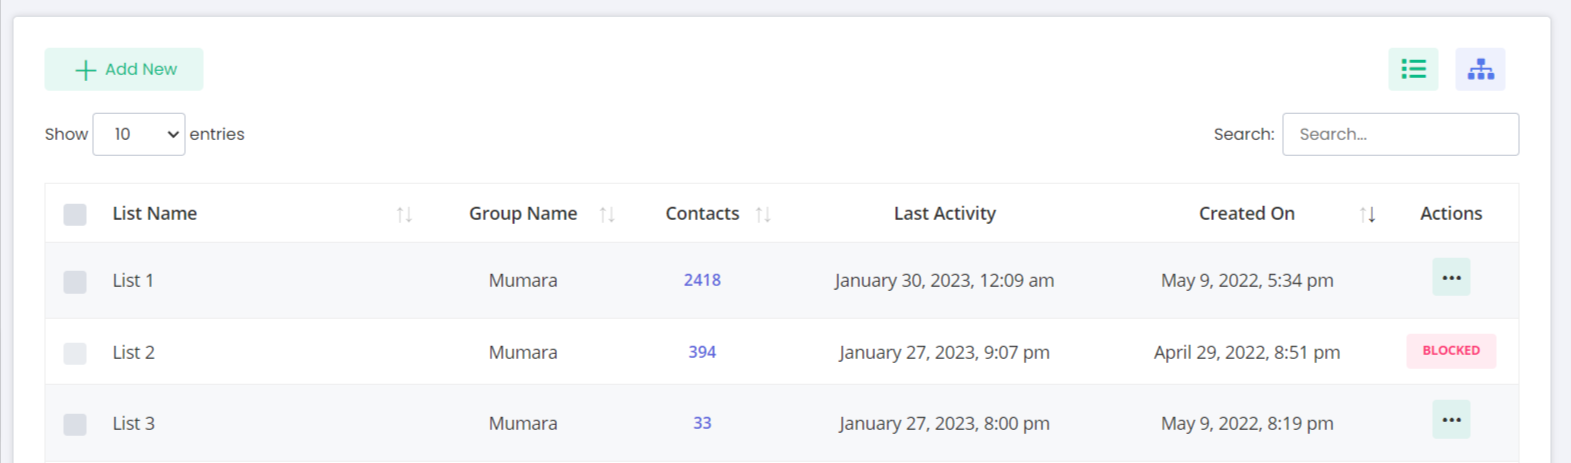
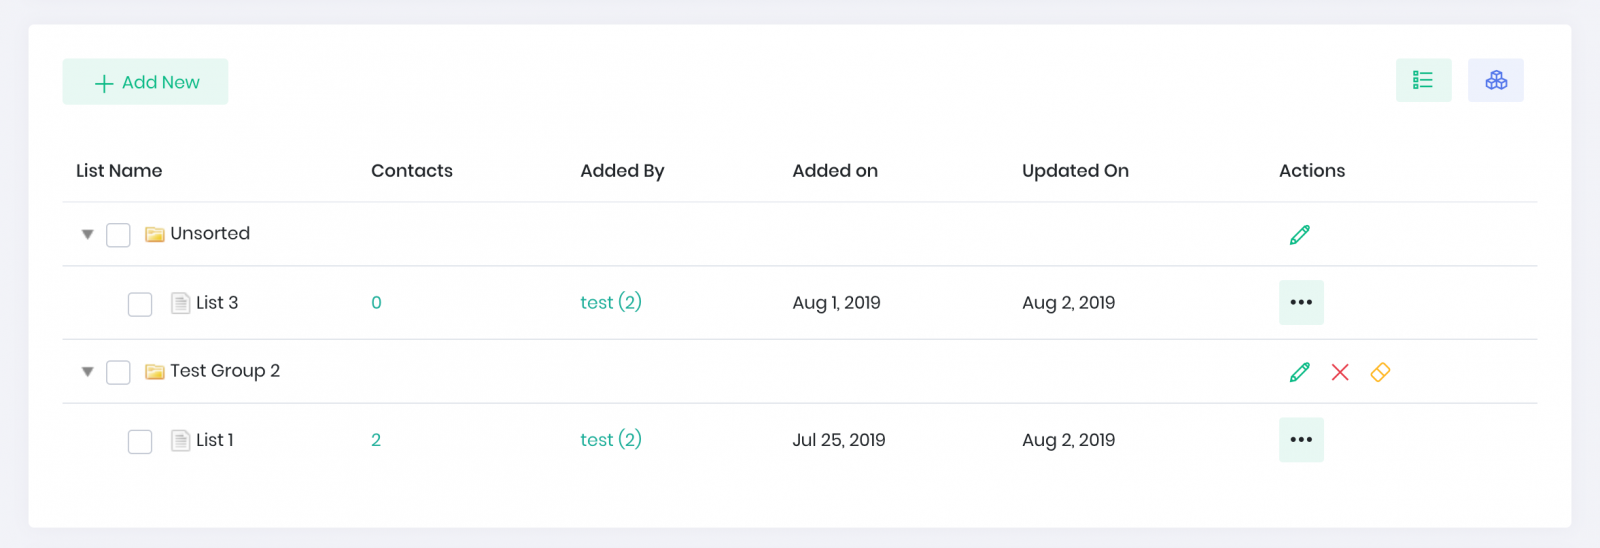
¶ Viewing Options
You can choose between List View or Tree View.
- List View
- Tree View
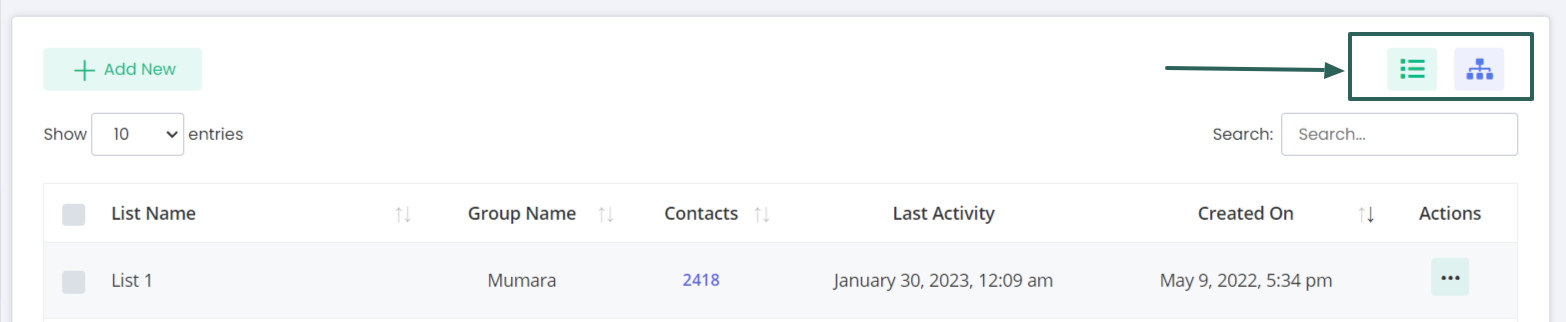
¶ 1- List View
The list view displays the contact lists as a simple table, with columns for the list name, group name, number of subscribers, and the date the list was created. Users can sort the lists by name, group name, creation date, etc., and perform various actions, such as editing or deleting a list, by clicking on the appropriate actions.
¶ 2. Tree View
The tree view, on the other hand, provides a hierarchical view of the contact lists, allowing users to see how the lists are organized and nested within parent lists. This view can be useful for users with complex organizational structures, as it provides a clear overview of the relationships between the different lists.
Both views provide easy access to the contact lists, and users can switch between the two views as needed, depending on their preference and the specific task they are performing.
There is no pagination available for this view but you can expand/collapse the groups and rearrange the lists by dragging them to other groups.
¶ Search a List
Find the search box at the top right corner just above the contact lists table to search for the list(s) by the name you input.

List Filters

- My Lists: Displays lists owned by your
- All Lists: Displays lists owned by you and all users
- User Lists: Display lists owner by a user account you select
Lists Per Page
Below list filters, you’ll find the dropdown of records to be displayed per page. Keeping it up to a minimum will assure processing however the default value is 50.

Pagination
Navigate between the next and previous pages using the pagination options at the bottom of the table.

Default Columns
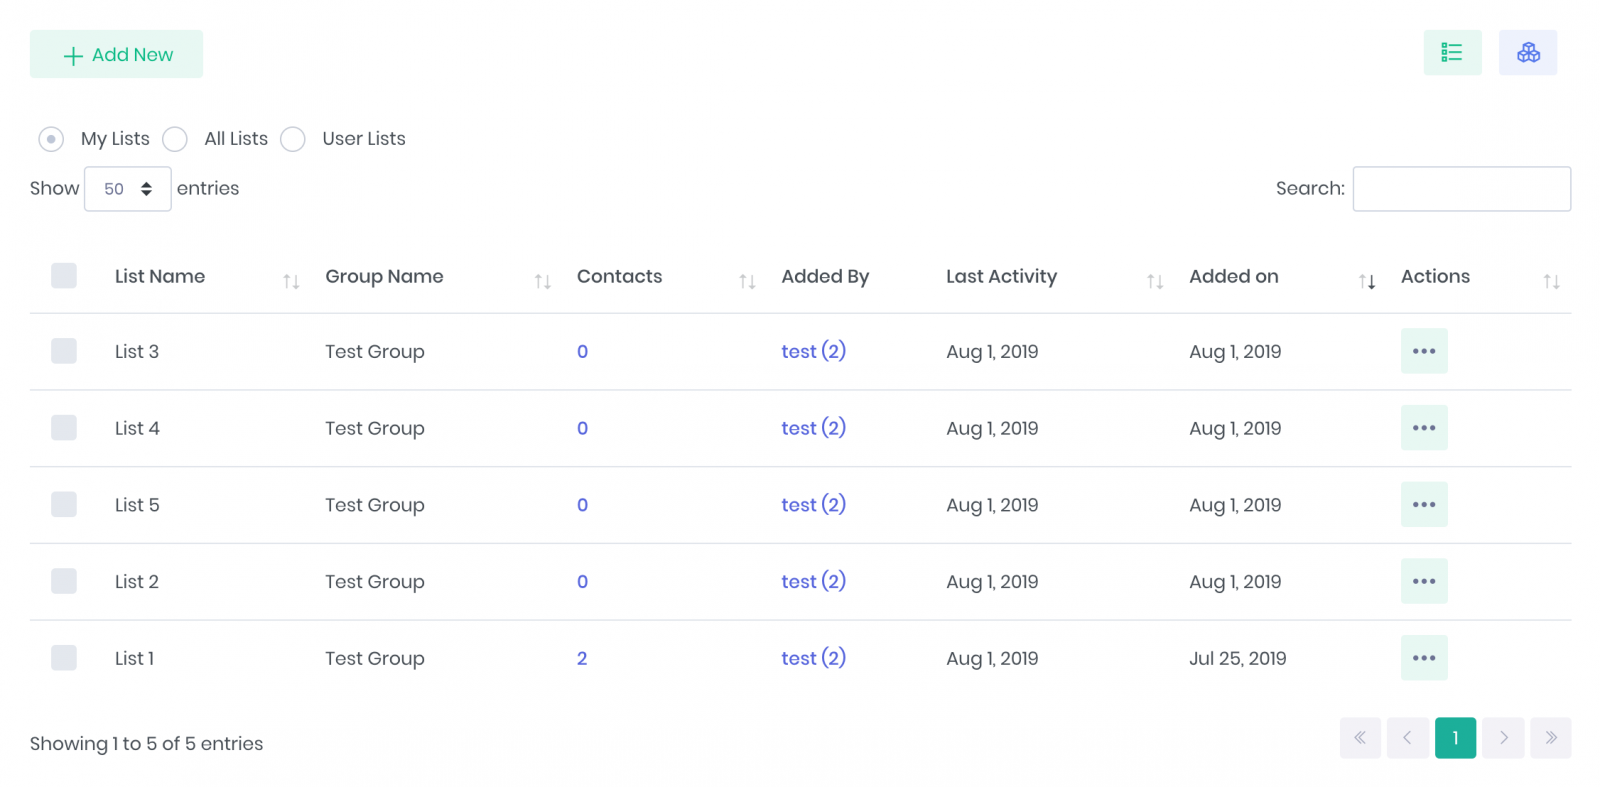
| Column Name | View Type | Description |
|---|---|---|
| List Name | List, Tree | Name of the contact list that you set while creating it |
| Group Name | List | It’s the group to which you have categorized the list |
| Contacts | List, Tree | Number of contacts this list currently has |
| Added By | List, Tree | The user who has created this list |
| Last Activity | List, Tree | The date when the last activity was performed e.g a contact has been added/updated, the list was modified etc |
| Created On | List, Tree | The date when this list was created |
| Actions | List, Tree | This button has several options related to the list that has been explained below |
¶ List Actions**
The action button carries several operations that can be performed on any list. The below table explains which option does which operation.
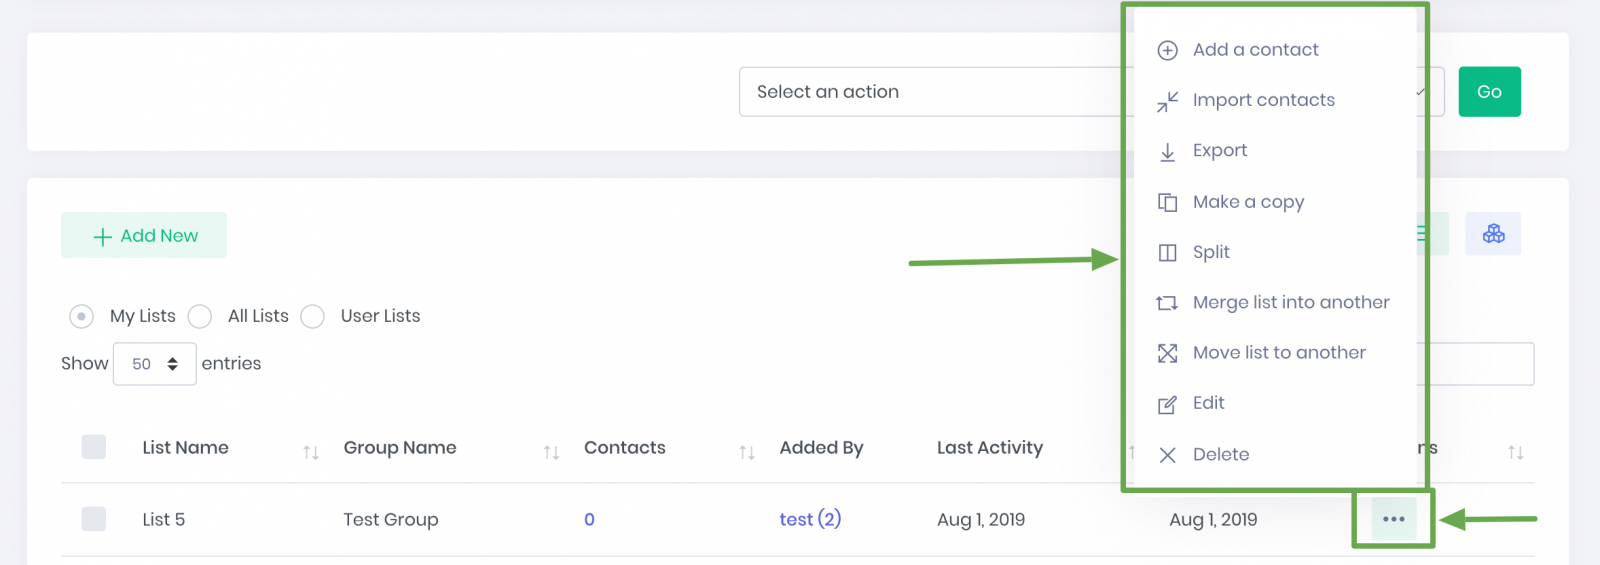
| Operation | Image | Description |
|---|---|---|
| Add a contact | View Image | Add a contact to this list. |
| Import contacts | View Image | It will take you to the import contacts page and allows you to import a CSV file of your contacts into this list. |
| Export contacts | View Image | It will start exporting the contacts of this list to a CSV file (in the background). Once the export is complete, it becomes available to download under the download icon in the top mini-menu. Files are available for 7 days and can be deleted anytime using the “Trash All” link. |
| Make a copy | View Image | It will make a copy of your list with the same details. This operation will not copy the contacts to this list. |
| Split list | View Image | Split a list into multiple parts. You can split a list by the number of contacts per list or into X number of lists. |
| Merge into another | View Image | Merging a list into another list will move the contacts of the source list to the destination list. |
| Move to another group | View Image | Re-arrange this list to another group. |
| Edit | View Image | Edit list details and assign/unassign additional/custom fields. |
| Delete | View Image | Delete this list and all contacts inside it. |
¶ Bulk Actions
Bulk actions dropdowns are placed at the top and bottom of the lists table/grid. Any action you choose from the dropdown will result in applying the chosen operation on every selected list and the contacts inside. Below you’ll see more explanation of individual action
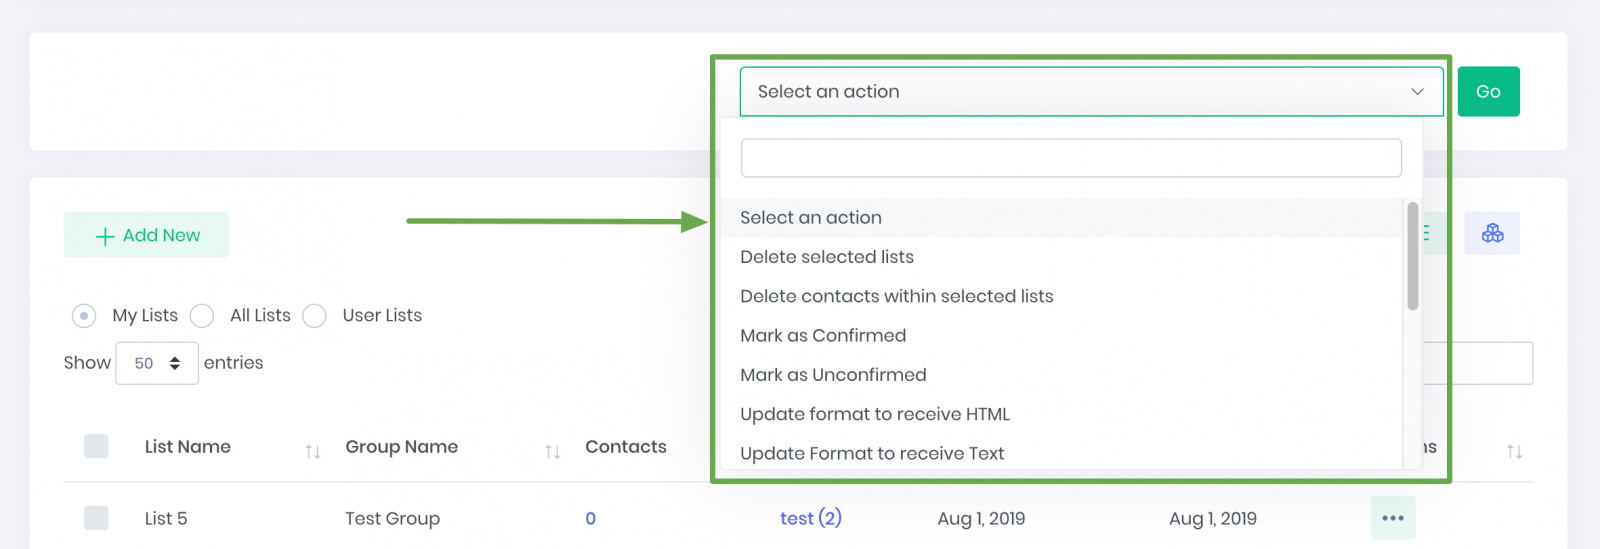
- Delete Selected Lists: It will delete the selected lists and all contacts inside them.
- Delete Contacts within Selected Lists: It will delete all contacts within the selected lists.
- Mark as Confirmed: It will set the confirmation status of all contacts inside selected lists to confirmed
- Mark as Unconfirmed: It will set the confirmation status of all contacts inside selected lists to unconfirmed
- Update Format to HTML: It will set the email format of all contacts of the selected lists to receive the HTML version of the broadcast.
- Update Format to TEXT: It will set the email format of all contacts of the selected lists to receive the TEXT version of the broadcast.
- Mark Soft Bounced as Active: Set the status of all contacts that were previously soft bounced inside the selected lists to “Not Bounced”.
- Mark Hard Bounced as Active: Set the status of all contacts that were previously hard bounced inside the selected lists to “Not Bounced”.
- Mark Unsubscribed as Active: Set the status of all unsubscribed contacts inside the selected lists to “Subscribed”.
- Set to Active: Set all inactive contacts inside selected lists to active.
- Set to Inactive: Set all active contacts inside selected lists to inactive.
- Delete Soft Bounced: Delete all contacts inside the selected lists that were previously soft bounced.
- Delete Hard Bounced: Delete all contacts inside the selected lists that were previously hard bounced.
- Delete Suppressed: Delete all contacts inside the selected lists that are matched with suppressed contacts.
- Delete Unsubscribed: Delete all contacts inside the selected lists that were unsubscribed.